
iPhone / iPad Gmail, Contacts, Calendars – Setup
You may think it’s easy to set up a Gmail account on your iPhone, and it can be, BUT if you use a personal email address based on your own domain that’s forwarded to a Gmail account it all becomes a little more complicated.
Contacts require a different setup to ensure automatic sync with your Google Contacts. Calendars are different again particularly if you want to sync with other peoples calendars.
Gmail first…
Here’s the scenario: Let’s say you’ve already set up this email forwarding:
les@lesbloggs.co.uk to lesbloggs99@gmail.com
*** First – configure your Gmail account to enable IMAP, this is essential.
Gmail – Mail Settings – Forwarding and POP/IMAP – Enable IMAP
*** Incidentally, make sure that your iPhone Firmware etc. is up to date (via iTunes)
Configuring your iPhone for Gmail:
Go into Settings
and click on Mail, Contact, Calendars

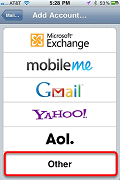
Choose Add Account…

Here’s the counterintuitive part: You would normally choose Gmail or Google here…. but there’s a better way!
Choose Other – Selecting Other will give you the opportunity to display your own domain’s email address for outgoing mail rather than using your Gmail address.
Select Add Mail Account
- Enter your full name as you want it to appear to the recipient, ie Leslie Bloggs
- Enter your real “personal” email address: les@lesbloggs.co.uk. Remember, this is not your Gmail address! It is your ‘personal’ address, the one you want the recipient to see and ‘reply to’.
- Enter your Gmail account password
- Enter any description, something appropriate – Les’s Gmail
- Next… (The new account is created)

Continue with the “New Account” setup
- IMAP is essential, not POP.
- ID section:
Name: Shows your full name… Leslie Bloggs
Address: Shows your desired personal email address les@lesbloggs.co.uk.
Description: Whatever you entered – Les’s Gmail - Incoming Mail Server:
Enter Host Name: imap.gmail.com
Enter User Name: lesbloggs99@gmail.com (your Gmail address)
Enter Password: your Gmail password - Outgoing Mail Server:
Enter Host Name: smtp.gmail.com
Enter User Name: lesbloggs99@gmail.com (your Gmail address)
Enter Password: your Gmail password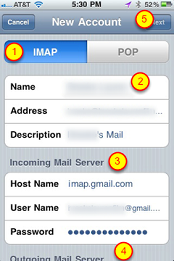
Then click Next … If all is well the phone will show “Verifying” followed by a brief screen with lots of items ticked. Otherwise curse and try again.
IMAP window will be displayed with Mail and Notes – ON
Press Save and the account will be added.
Your incoming and outgoing Gmail messages should now work smoothly and your outgoing messages will be identified with your custom email address. See my notes which follow later for info on adding multiple “from” addresses.
Sync contacts with your iOS device
To sync your Google contacts with your Apple iOS device (iPhone, iPad, iPod touch), use CardDAV, which is an Internet open standard. When you sync your Google contacts using CardDAV, you’ll be able to edit, add, and remove contacts from your device and keep them in sync everywhere you use them.
Syncing via CardDAV is only available over SSL for Apple devices on iOS version 5.0 and above. If you use Google Apps for Business, use Google Sync to sync your contacts.
Here’s how to sync your contacts to your device:
- Open the Settings application on your device.
- Select Mail, Contacts, Calendars.
- Select Add Account…
- Select Other
- Select Add CardDAV Account
- Fill out your account information in the following fields:
- Server: Enter “google.com”
- User Name: Enter your full Google Account or Google Apps email address.
- Password: Your Google Account or Google Apps password. (If you’ve enabled 2 Step verification, you’ll need to generate and enter an application specific password.)
- Description: Enter a description of the account (e.g. Personal Contacts).
- Select Next at the top of your screen.
- Make sure that the “Contacts” option is turned to ON.
After you’ve completed setup, open the Contacts app on your device, and syncing will automatically begin.
Setting Google contacts as your default account
If you have set up iCloud, if you are syncing contacts from another account, or already have contacts stored on the device, you will need to select a Default Account.
Set your default account
- Open the Settings application on your device.
- Select Mail, Contacts, Calendars and scroll down to the Contacts section. You will only see the Default Account option if you are syncing more than one account.
- Select Default Account.
- Select your Google contacts account. Your account will be labeled with the description you gave it in the Description field.
New and existing contacts
New contacts created directly on your iOS device will be added to your default account.
Existing contacts should be imported into Google contacts. If your contacts are stored on an Apple device, you can transfer your contacts using vCard files. If your contacts are stored with another provider, first export your contacts and then import your contacts into Gmail.
Troubleshooting steps
If you have any problems, please try these things first:
- Open the CardDAV account you established at Settings > Mail, Contacts, Calendars under Accounts. Make sure that the Account option is turned to ON.
- If the Account is ON, then open Advanced Settings below and make sure Use SSL is turned to ON.
- If you have changed anything, please click Done and the top right of the screen showing your account settings to save those changes.
- If you’re still experiencing issues syncing your contacts using CardDAV, please login to your Google account on the web. You might be prompted to acknowledge an “Unusual sign-in location”.
Sync Google Calendar to your iOS device
CalDAV is an internet standard that’s used to sync Google Calendar with your Apple iOS devices (including iPhone, iPad, and iPod Touch) and iCal.
Getting started
To sync with your device, follow these steps:
- Open the Settings application on your device’s home screen
- Open Mail, Contacts, Calendars
- Select Add Account…
- Select Gmail
- Enter your account information:
- In the Name field, enter your name as you’d like it to appear to others.
- In the Email field, enter your full Google Account or Google Apps email address.
- In the Password field, enter your Google Account or Google Apps password.
- If you are a 2-step verification user, please use an application-specific password instead of your regular password in this field.
- In the Description field, enter a description of the calendar (e.g. “Personal Calendar”).
- Select Next at the top of your screen.
- Make sure the Calendars option is turned on.
After you’ve completed setup, open the Calendar app on your device. Syncing will automatically begin.
By default, only your primary calendar will be synced with your device. If you have additional calendars that you would like to sync, follow the instructions below.
Sync Multiple Calendars
Visit the following page from your device’s mobile browser (Safari?) https://www.google.com/calendar/syncselect
Google Apps users can go to:
https://www.google.com/calendar/hosted/your_domain/syncselect(replacing ‘your_domain’ with your actual domain name)
Select the calendars you’d like to sync, then click Save.
The selected calendars will be displayed on your device at the time of the next sync.
Setting up Gmail Calendars using Microsoft Exchange
- Optionally, perform a sync with iTunes to ensure that Contacts and Calendars etc. from your phone are backed up to your computer.
- Open “Settings” on the Iphone.
- Open “Mail, Contacts, Calendars”
- Press “Add Account”
- Select “Microsoft Exchange”
Enter Account Info
- In the Email field, enter your full Google Account email address lesbloggs99@gmail.com
- Leave the Domain field blank.
- 3. Enter your full Google Account email address lesbloggs99@gmail.com as the Username
- Enter your Google Account password as the Password.
- Tap Next at the top of your screen.
- Choose Cancel if the Unable to Verify Certificate dialog appears, curse quietly.
- When the new Server field appears, enter m.google.com.
- Press Next at the top of your screen again.
Disable Mail in Exchange
(this is already setup using IMAP)
Select the Google service (Calendars) you want to sync and make sure it is set to On.
Mail and Contacts needs to be turned Off within Exchange (used for Calendars only).
You’ve set up Google Sync! Synchronization will begin automatically if you have Push enabled on your device.
Settings – Mail, Contacts, Calendars – Fetch New Data – Push = 0n
I
iPhone Mail “Signature” Settings
You can easily stop the ‘Sent from my iPhone’ text from appearing on your iPhone emails by removing the text from the iPhone signature settings:
Tap on “Settings”
- Tap on “Mail, Contacts, Calendars”
- Scroll down and tap on “Signature”
- Tap on “Clear”
- Now exit from Settings and your iPhone will no longer attach the “Sent from my iPhone” message with emails.
How do you change the iPhone email signature?
If you just want to change the iPhone email signature from the ‘sent’ message, just follow the directions from above but instead of tapping “Clear” and closing out, type a new message. When you exit the Signature Settings, your message will be your new signature.
To switch off “BEEP” when new mail arrives:
Settings – Sounds – New Mail = off
How to add additional “Sent From” addresses:
We’re going to modify the Gmail account you’ve just created in a minute. First, though, we need to copy a comma into the clipboard. Sounds weird, but bear with me.
- Press the Home button, then swipe right to get to the search screen. Type a single comma in the search field, double tap the search field itself, tap ‘Select All’, and then tap ‘Copy’ so that you copy the comma to the iPhone’s clipboard:
- Open the Settings app again, then tap ‘Mail, Contacts, Calendars’.
- Tap the Gmail account you created in earlier steps and on the next screen select the IMAP Account to show the “IMAP Account Information” so that you can edit it.
- Tap the ‘Address’ field (may show as “Email”) once to place the cursor at the end of your Gmail address.
- Double tap the same Address field to bring up the Select/Paste options:
- Then, being sure that the cursor is at the end of the line and that no part of your address is selected, tap Paste to add a comma to the field. (We do this because there’s no way to access the comma from the keyboard once the cursor’s in the Address field, strange but true.)
- Now, start typing one of your secondary email addresses that you’d like to be able to send email from.
- Add as many email addresses as you like. You should end up with a list of email addresses, separated by commas. The field should end with a ‘.com’ or ‘.co.uk’ or some other domain, not with a comma.
- When you’re done, click on “Done” then tap your iPhone’s Home button to get back to your Springboard. (The Settings app saves the changes you’ve just made automatically.)
- To check it’s worked, open Mail, browse to your Gmail account, and create a new message:
- Tap the “Cc/Bcc, From:” field (before it may have only shown Cc/Bcc) to open it up, then tap the “From:” field. You should see a scroll wheel containing all of the email addresses you just entered. If not, don’t panic, just shut down your phone by pressing and holding the power button, and it should work the next time you power up and use Mail.
IPad Instructions
It’s even easier on the iPad. No faffing around with cutting and pasting commas:
- Tap the ‘Address’ field once to place the cursor at the end of your Gmail address:
- Now, start typing your secondary email addresses, each separated by a comma. To type a comma on the iPad when you’re in an email field like this, first tap the ‘.?123’ key followed by the ‘#+=’ key. The comma will appear in the top right of the keyboard, to the left of the backspace key.
- Tap ‘Save’.
- Tap your iPad’s Home button to get back to your Springboard.
- To check it’s worked, open Mail, browse to your Gmail account, and create a new message.
- Tap the “Cc/Bcc, From:” field to open it up, then tap the “From:” field. You should see a picker overlay containing all of the email addresses you just entered. If not, just power down your iPad by pressing and holding the power button, and it should be there when you next power up and use Mail.
Syncing Multiple Google Calendars
In order for this to work correctly, you’ll need to make sure you have your Google account setup through Microsoft Exchange on your iDevice as shown earlier in these instructions. When you first sync your iPhone with your Google account, only your default calendar is synced with the calendar app. In order to enable additional calendars you’ll need to follow these steps:
- Start Safari web browser.
- Visit https://www.google.com/calendar/iphoneselect and select the additional calendars you would like to share with your device. Do not make any other changes to email settings etc. Make sure to “save”.
- On your iPhone go to m.google.com in the Safari browser app.
- Select the “Sync” icon
- Choose which device you would like to apply these new settings to (iPhone).
- Select which shared calendars associated with your Google Account you would like to share with your iPhone Calendar App.
- Make sure you “save”.
- Open your Calendar App on the iPhone and touch the “Calendars” button. You’ll see there are now more calendars displayed, select all the calendars you want to view and press “Done”.
- The calendar colour you choose for your shared calendars in Google Calendar gets transferred to your iPhone.